My upcoming children's book, The Typewriter, is the third and final installment of my wordless trilogy that applies imagination to different elementary school subjects. Where CHALK and FOSSIL explored art and science, The Typewriter blends imagination with writing. In addition to providing entertainment for young readers, my hope is that creative teachers will use these books as a tool to educate and inspire their students.
The star of The Typewriter is a beautiful 1936 Underwood portable typewriter that I purchased on Ebay. Originally, I was going to use a Royal typewriter that I already owned, but it was too large and cumbersome to be believably handled by children. In addition to demonstrating the power of words, I hope this interesting artifact will generate discussions about keyboards and other historic tools used for writing.
While the typewriter was in beautiful working condition, it's case was smelly and falling apart. This photo shows my son's reaction to its musty odor. I wanted a much more enchanting container to house my creator of dreams.
As a result, I decided to transform the case into something more intriguing for a child. First, I peeled off the outer covering that was already torn and detached in many areas.
Next, I sanded down the wood to remove the glue stains and provide a smooth surface.
Then I masked off the hardware with tape and liquid frisket and painted the entire case with several coats of gesso. I kept a ruler under the lid so the cover wouldn't stick. The gesso filled in most of the cracks and holes. I sanded it again after it dried thoroughly.
Next, I painted the entire case with several coats of black acrylic paint. When that dried, I painted it again with a coat of polyurethane so the surface would have a reflective finish.
When everything was dry, I added large Gerber letters over the entire surface of the case (using the font, American Typewriter). I didn't bother to repair the handle because I could paint that to look new.
Now my magical typewriter had a case worthy of its power and hopefully will command children's interest!
In my story, a group of children stumble upon a closed carousel and see the case sitting on the back of a bumble bee ride. Rather than trying to find a carousel bee (if one even exists), I decided to make my own. I began by making a rough shape of the bee's body out tinfoil.
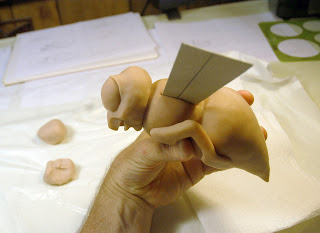
Next, I surrounded the tinfoil with Sculpty clay and formed a basic body shape that could later be hardened by heating it in an oven. I also made slots on its back that I would later put wings in.
I "cooked" the body shape so it would provide a solid hard base to work over. Then I added a second layer of Sculpty and began to form a head and other details.
I continued forming the head until it was a happy bee…
and then I cooked it again.
Next, I added arms than would also function as foot rests on my bee ride design.
And finally, I cut wings out of foam and created antennae out of wire. Then I painted it with acrylic paint.
I also rested a tiny jewelry box on the bee's back that would give me information about the shadows and bounced light that a case on its back would create.
My bee ride was nearly complete. Using Photoshop as the last step in my reference development, I integrated photos of my bee and case with photos of an actual carousel. Now all my reference was complete and I was finally ready to start drawing and painting!


